How can we help?
Short, practical walkthroughs of your charity workspace — from your first donation page to Gift Aid claims.
Popular walkthroughs
Start hereAll guides
Select a guide to reveal the steps. Screenshot-style examples use fictional names and amounts.
Getting started
3 guidesGetting startedConnect your GoCardless account3 min
InstantDonate uses a charity’s own GoCardless account. The hosted GoCardless flow handles connection and bank setup; InstantDonate never asks charities to enter their GoCardless access tokens or supporters’ bank details.
- Start from InstantDonate registration, or reconnect from an existing account.
- Complete the GoCardless-hosted steps and return to your InstantDonate dashboard.
- Check the GoCardless account panel. It must show Verified · Payments enabled before donors can start new collections.
- Stay in Sandbox while trying example donations and payments. They do not move real money.
Getting startedUnderstand the dashboard and review queue2 min
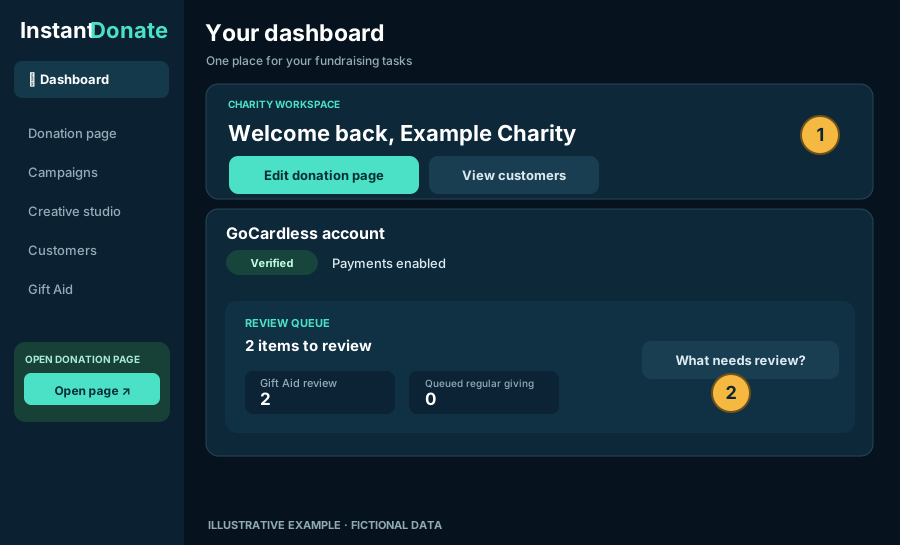
The dashboard is the starting point for donation-page editing, campaigns, customers, Creative Studio and Gift Aid.
- Use the left navigation on desktop or the navigation at the top on mobile to choose an area.
- Use Open donation page and Copy donation link for your public fundraising URL.
- Review the Review queue when it has a non-zero count. It identifies tasks, not a score showing how many errors you have.
The queue focuses on Gift Aid decisions and adjustments, and regular giving waiting for mandate activation. Failed-payment alerts are displayed separately when there are new failures requiring attention.
Getting startedOpen and share your donation page1 min
- Sign in to your dashboard.
- Locate YOUR DONATION PAGE under the InstantDonate logo. The actions appear near the top on both mobile and desktop.
- Choose Open donation page ↗ to check it in a new tab, or Copy donation link to share it.
- For campaign-specific links, open Campaigns and select the campaign’s share/open action.
Fundraising
4 guidesFundraisingCustomise your charity donation page4 min
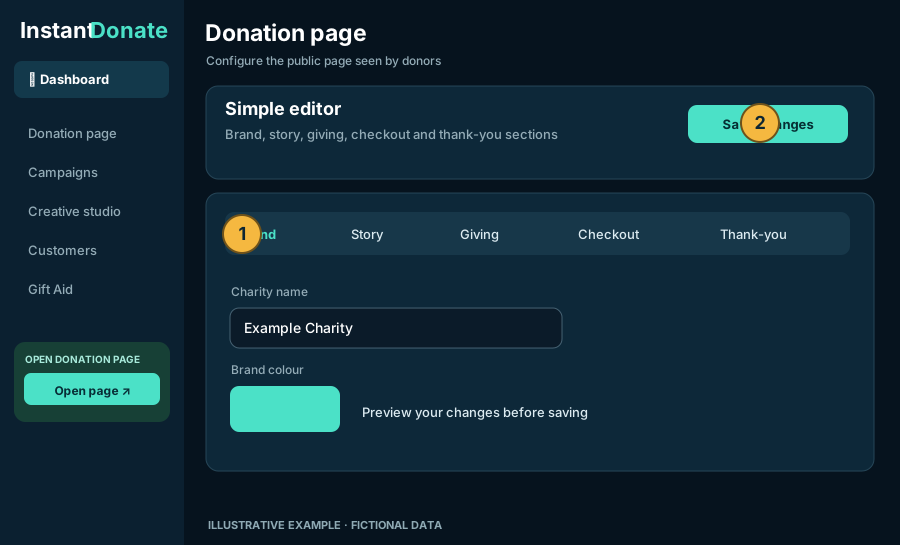
- From your dashboard choose Donation page or Edit donation page.
- Start with the Simple editor. Work through Brand, Story, Giving, Checkout and Thank-you.
- Change the charity presentation, suggested amounts, messages and available design options.
- Check the preview before saving. Use advanced design options only when you need them.
- Choose Save draft to keep unpublished work private, or Publish changes to update the public page. Each changed publication automatically saves the previous published design in Page version history.
- Use Load as draft to preview an old published design without affecting visitors, or Restore published to roll back with confirmation. The current published design is preserved as another version first.
FundraisingCreate a campaign and track progress3 min
- Open Campaigns in the dashboard.
- Create a new campaign with a title and target amount. Add an impact statement, description and optional image.
- Choose optional start/end dates if the appeal is time-limited.
- Save the campaign and use its Manage controls to make changes or publish updates.
- Open its campaign-specific donation URL to share it with supporters.
Campaign progress uses recorded confirmed donations, not newly initiated or pending payments. Refunded donations are excluded from the raised total.
Campaign performance: open Campaigns to see how many donations were started, how many were confirmed, and the confirmed amounts by tagged source. Choose Copy tracked campaign link to make separate links for social posts, posters, QR codes, websites or email. Sources are link labels, not independently verified attribution or unique visitor counts.
FundraisingDesign posters, QR codes and social graphics4 min
- Choose Creative studio from the dashboard.
- Select the campaign you want to promote.
- Choose Poster & print or Social media.
- Pick a layout and size; edit the wording, logo, photography, typography and colours.
- Check the preview and print/save the poster as a PDF or download the available asset format.
Poster links and QR codes send donors to an InstantDonate-hosted donation page. Preview the destination after choosing a campaign to make sure the right appeal opens.
FundraisingAdd live campaign progress to your website5 min
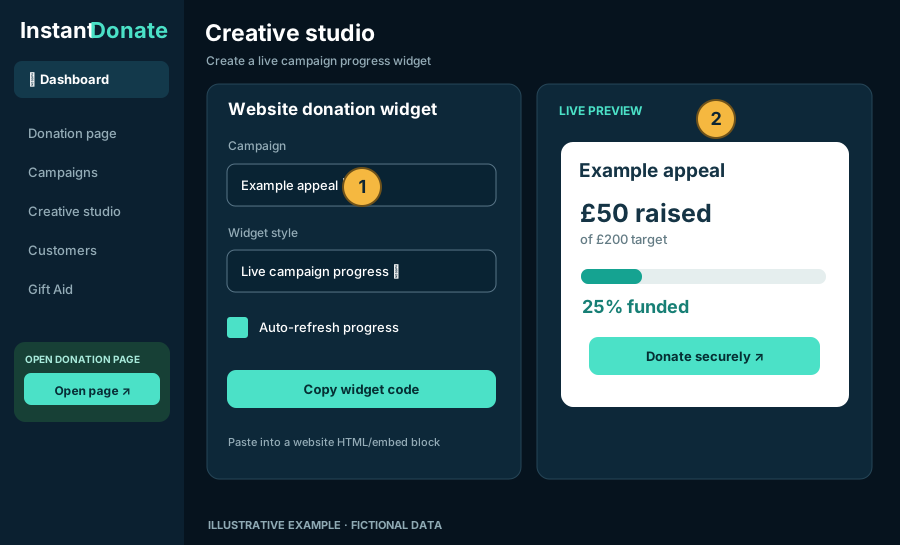
- Go to Creative studio → Website widget (under Other campaign tools).
- Choose the campaign, set Widget style to Live campaign progress, and enable automatic refresh.
- Check the preview. Use Open live widget separately if the embedded preview is blocked.
- Choose Copy widget code.
- In your own website builder, add a Custom HTML / Embed block and paste the code. Preview the website and publish it when ready.
The widget is a public, read-only display of campaign progress. The donation button opens the secure InstantDonate site rather than collecting bank information on the charity's website.
<iframe> embeds. If your site uses a Content Security Policy, its frame-src must allow https://instantdonate.uk. Some site builders, social networks and emails prohibit iframes. In those cases, use a donation link or button instead.Figures typically refresh every 60 seconds while the widget is visible. They reflect confirmed payments, not pending ones. Sandbox figures are for testing.
Customers & payments
5 guidesCustomers & paymentsFind a customer and show hidden history3 min
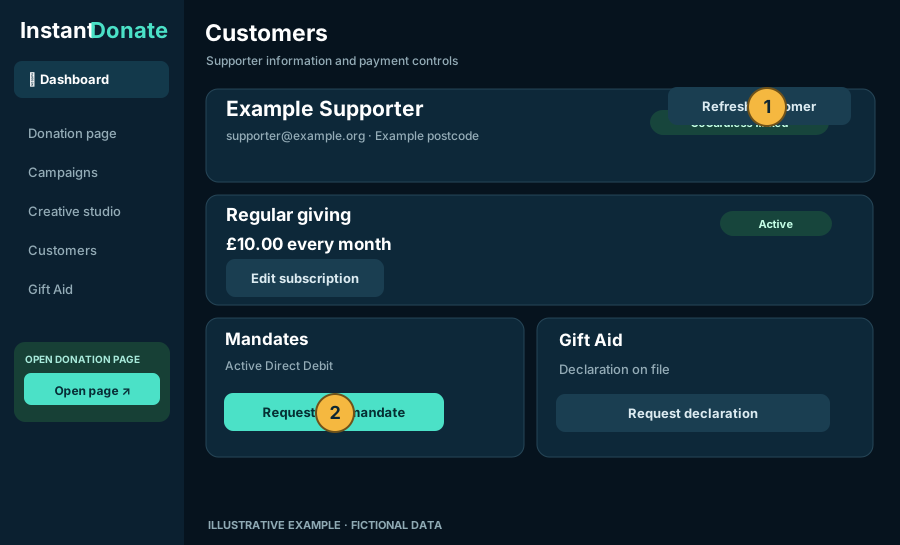
- Open Customers and search by name, email or postcode.
- Select a customer to view their payments, bank-account references, mandates, subscriptions and Gift Aid information.
- To declutter the default customer list, inactive customers are hidden unless you select Show inactive customers.
- On an individual customer, choose Show inactive history to reveal cancelled/failed mandates, subscriptions or payments.
Review filters may show otherwise inactive customers when they have an actionable item. Nothing is permanently deleted by hiding historical records.
Customers & paymentsRefresh customer data from GoCardless2 min
Each customer has a Last updated indicator showing how recently InstantDonate received their GoCardless information and whether it came from a webhook, an automatic sync or a manual refresh.
- Open the customer and read the time next to Refresh from GoCardless.
- If it was just updated, you normally do not need to refresh. The button is disabled for roughly two minutes after a recent update.
- When available, choose Refresh from GoCardless to fetch that customer's latest details.
- Remain on the same customer page. You can also use Copy customer link for a direct, sign-in-protected URL.
Customers & paymentsRequest a new Direct Debit mandate3 min
- Open the customer you want to help.
- Scroll to the Mandates card and choose Request new mandate.
- InstantDonate creates a secure, GoCardless-hosted mandate setup link associated with the existing GoCardless customer.
- Copy the link and send it to that supporter using an appropriate communication channel.
- After the supporter completes the process, wait for the GoCardless status to update or use the customer refresh control when appropriate.
The charity cannot complete the supporter’s bank authorisation for them. Avoid emailing or copying bank details into InstantDonate; the supporter enters those details directly with GoCardless.
Customers & paymentsCreate or manage regular giving4 min
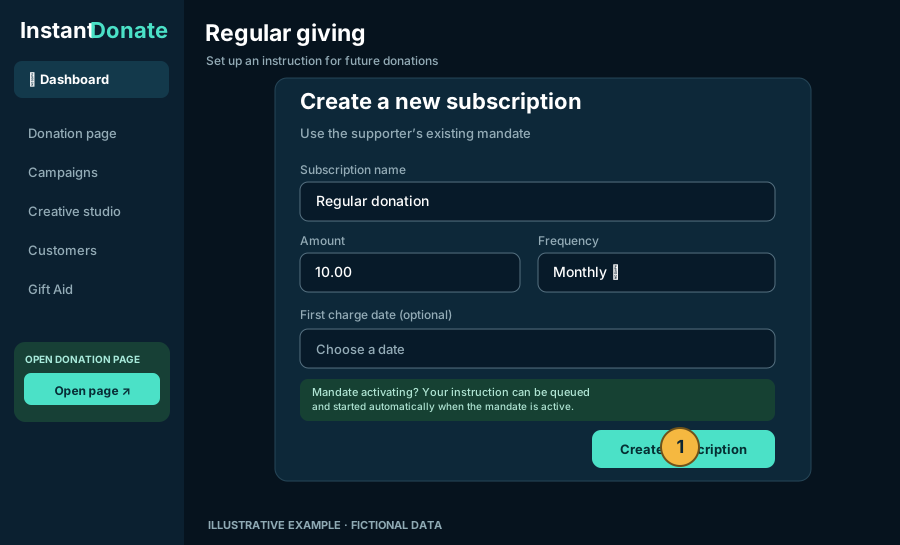
- Open a customer and find the Regular giving card.
- Choose Create new regular giving when available.
- Enter the subscription name, amount, frequency and optional first charge date.
- If the mandate is active, InstantDonate can create the subscription at GoCardless. If an eligible mandate is still activating, the instruction can be stored as Awaiting mandate and activated automatically once the mandate becomes active.
- For an existing subscription, use the available Edit, Pause, Resume or Cancel controls as appropriate.
Customers & paymentsReview failed payments and handle refunds4 min
- Use the failed-payment notice on the dashboard (if one appears) or the relevant Customers filter.
- Open the affected customer; choose Show inactive history if needed.
- Read the failure details and offered actions. Retry is only shown when appropriate for the payment and mandate status.
- For an eligible payment, use Refund via GoCardless. When a refund occurred outside InstantDonate, use Mark refunded externally to keep records accurate.
- For an eligible payment that failed due to insufficient funds, with an active mandate and no Success+ retry already planned, choose Retry payment and select your requested charge date. GoCardless checks that it is permitted by the bank processing timetable and its retry limits.
- Pay attention to the confirmation messages before submitting any refund or cancellation.
Reset alert dismisses the old failed-payment backlog for that charity; it does not delete failed payments, change their actual GoCardless status, or refund anything. Future new failures will appear again.
Gift Aid
3 guidesGift AidRequest a Gift Aid declaration from a donor4 min
Gift Aid eligibility depends on the donor’s own declaration and the donation in question. A declaration for one donation does not automatically cover later donations.
- Open the customer's Gift Aid section.
- When offered, choose Request new Gift Aid declaration.
- Send the generated secure declaration link to the supporter.
- The supporter reviews the declaration wording, details and relevant scope, and must explicitly accept it.
- Once recorded, eligible donations can be reviewed or included under the scope of the new declaration.
Gift AidReview GoCardless-imported payments for Gift Aid3 min
Payments collected directly through GoCardless are initially marked for Gift Aid review, instead of automatically being included in an HMRC export.
- Open Gift Aid review from the dashboard’s review queue or the Customers filter.
- Select the customer and check whether the payment is covered by a qualifying declaration.
- Choose Include when the declaration covers that payment and you have verified the details.
- Choose Exclude when the payment should not be claimed.
- If you see New declaration required, use the donor declaration request flow first. You cannot include an uncovered donation.
If a payment is refunded or a previously exported claim needs correcting, follow the Gift Aid adjustment process rather than changing submitted evidence silently.
Gift AidDownload and track your HMRC Gift Aid claim5 min
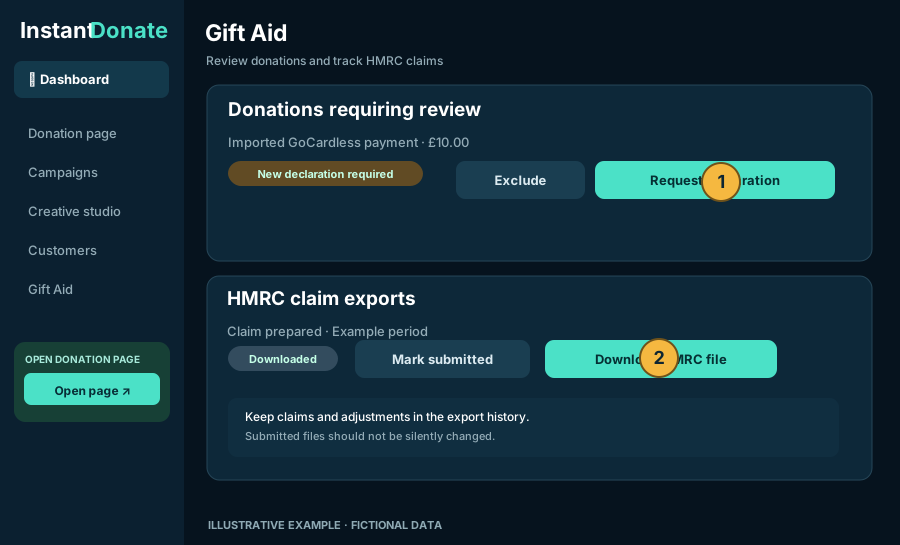
- Open Gift Aid on the dashboard.
- Open the Gift Aid claim checker. Review groups of payments awaiting a Gift Aid decision, payments missing a covering declaration or donor details, and required HMRC adjustments before preparing the file.
- Review declarations, the payments selected for claiming and any adjustments needing attention.
- Create/download the HMRC-compatible .ods spreadsheet from the export controls. Check the donor details, dates and total before submitting it.
- When you have actually submitted the file to HMRC, select Mark submitted.
- After HMRC responds, mark the claim Paid or Rejected as appropriate.
The status buttons are InstantDonate’s record of what happened: marking a file “submitted” does not send it to HMRC for you. A rejected claim can be corrected and resubmitted as appropriate. Export history and adjustments should be retained for the audit trail.
Troubleshooting
2 guidesTroubleshootingSomething is missing or out of date3 min
- Check the customer’s Last updated label before refreshing.
- Use the customer-specific GoCardless refresh when enabled. Avoid repeated full-account checks.
- Open the correct Customers filter, including Show inactive customers or Show inactive history for historical records.
- Check whether the payment is still in a normal bank-processing status.
- If a live widget is blank, first choose Open live widget separately, then verify the campaign is active and your external site allows HTTPS iframes.
- Try the direct dashboard or customer link again if you were redirected away from the customer after a reload.
TroubleshootingPrivacy, security and Sandbox basics3 min
- Sandbox: test collections, balances and widget totals are not real money.
- Supporter privacy: customer pages require charity login. Do not post customer URLs or copied information publicly.
- Bank authorisation: supporters authorise payments on hosted GoCardless pages; do not request bank details by email.
- Refunds: confirm the payment and status carefully before performing irreversible actions.
- Gift Aid: store declaration evidence and use the correct scope; only the supporter can provide new consent.
- Embeds: website progress widgets display public campaign totals. Do not embed the dashboard or internal customer pages.
Always check which environment you are using before sharing a donation page outside your testing team.
No matching guides
Try a simpler search such as “refund”, “donation page” or “Gift Aid”.